A question came up recently in one of my GitHub repositories where someone was wondering if you could enable ratings on a SharePoint list via the REST API.
After a bit of research, I found an undocumented (use this at your own risk!) API. The Microsoft API has an endpoint listed under the root _api folder named Microsoft.SharePoint.Portal.RatingSettings.SetListRating.
This endpoint requires a POST request and takes two parameters: listID and ratingType (1 = Star Ratings, 2=Likes)
As mentioned previously, this is an undocumented API and I’ll probably get yelled at for promoting it! 🙂 So please, use this at your risk as you won’t be provided any support from Microsoft if you implement this.
One of the newest features to come to SharePoint Online is the ability to add comments within the activity panel on SharePoint list items. In a previous post, I talked about how we can retrieve these new comments using the SharePoint REST API.
List comments are a great new way for users to collaborate together on list items as users can have threaded conversations with one another.
In the past we would have used a multi-line text column with “append changes” to create threaded conversations on list items. The problem with this is this method creates new versions and those comments are difficult to retrieve programmatically. Please see my post on retrieving values in multi-line text fields more efficiently.
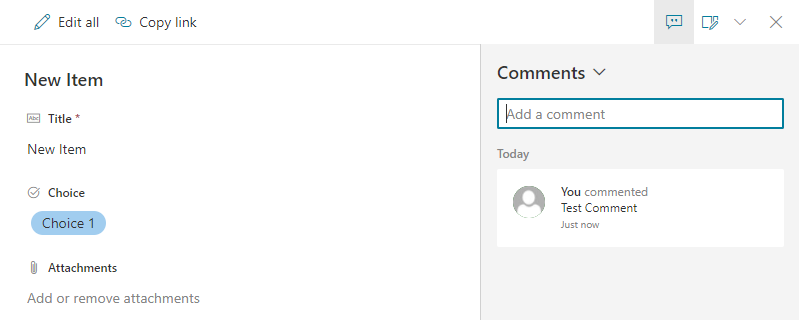
Add a comment using the REST API
Recently, I’ve been seeing more posts on support forums and in social asking how these comments can be accessed and created programmatically. Well, like most things in the modern interface, they are implemented using client-side code, which must mean there is a REST API backing the functionality.
You will need to execute a POST request to the following endpoint
Using the above POST call, you can submit a new comment to the list item as the current user (there is no way to add list item comments on-behalf of another user). When you execute the request and update your x-requestdigest, and the appropriate values for the URI, your comment will be successfully added to the list item (see below).
I hope you find this post helpful and if you have any questions, please feel free to reach out!
One of the most common questions I see in SharePoint support forums is how to retrieve the history of a multi-line text field with “append changes” in SharePoint. In most cases, the answer is to retrieve each previous version of a SharePoint item and iterate through them to construct all values in the multi-line text field.
The reasoning behind this is fairly obvious — each instance of a change in the multi-line text field is stored in a separate version of the SharePoint item.
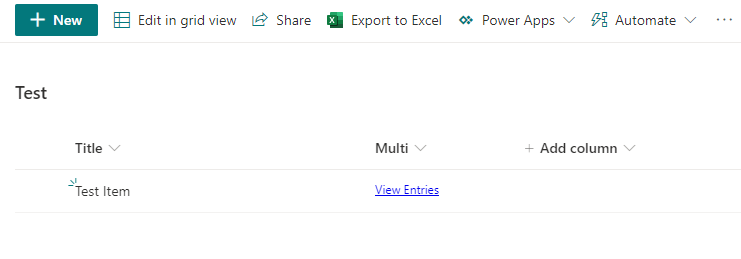
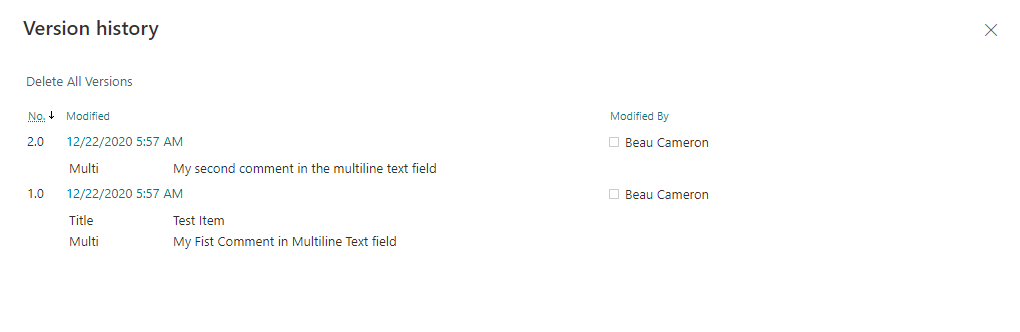
Take for example the following Test list. This list contains a title field and a multi-line text field with “append changes”
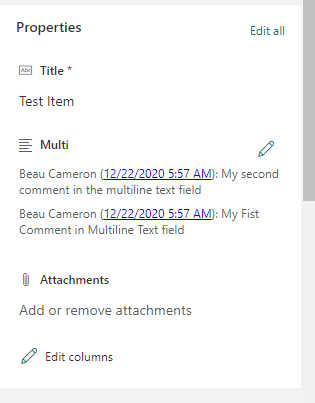
If you open up the information panel for this item, you will see the multiline text field with the previous values. Notice how I have updated this item twice and added a value to the Multi field multiple times.
In order to see how SharePoint stores this data, check out the version history. The version history shows the two times I have edited the item, with the latest version being the most recent value in the multi-line text field.
Now you can see why you need to loop through versions. If you did a standard REST call using something like _api/web/lists/getbytitle(‘Test’)/items(1), the Multi column would only have the value of “My second comment in the multiline text field”.
Well, fear no more! There is in fact a way to retrieve the values in your list item without having to iterate over each previous version of the item.
Introducing RenderExtendedListFormData()
An unknown and undocumented REST endpoint exists in SharePoint Online called RenderExtendedListFormData() is the solution we need. You may be saying, “oh, we shouldn’t use undocumented REST endpoints”. Valid point, however, you should be aware that this endpoint is exactly what is used when rendering the information pane in Modern SharePoint via first-party.
Below you will see how to make this request into SharePoint. The RenderExtendedListFormData method is a POST call and takes 5 parameters:
itemId – The ID of your list item
formId – The form name (this is how MSFT determines what fields are returned in the request based on the form)
mode – I haven’t figured out what this means yet
options – I haven’t figured out what this means yet
cutoffVersion – Which is the latest version you want to pull. e.g, if you pass in 0, it will retrieve every version up until the first. If you pass in “2” it will put every version up until 2.0.
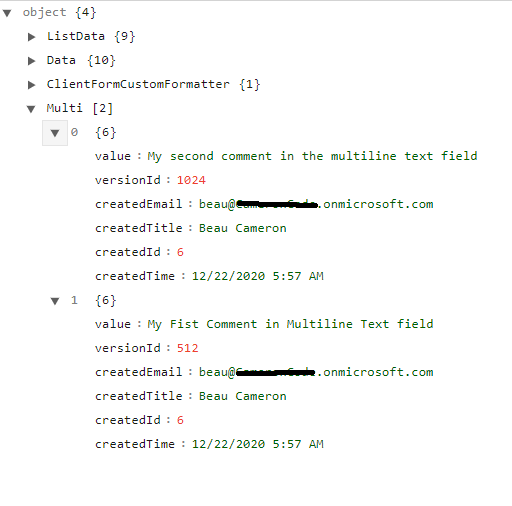
The response from this call includes a lot of data as it’s used for the rendering of the edit form, but if you look closely you’ll notice the values for the multiline text field are stored in d.RenderExtendedListFormData.<ColumName>
The Multi (your column name) object contains all of the values in the multi-line text field based on the parameters of my REST call above. The response includes the text value, who wrote the value (email, title, id) as well as when the item was created.
HOW AWESOME IS THAT?! I retrieved all appended changes of my multi-line text field, using a single REST call.
Caveats + FYI
As mentioned previously, this is an undocumented REST endpoint. Even though this is used first-party by Microsoft, you should be aware this endpoint is subject to change and your solutions will have a dependency on that. Use at your own risk!
If you know what the other parameters (mode / option) mean in the REST call, I’d love to find out! Please message me if you know!
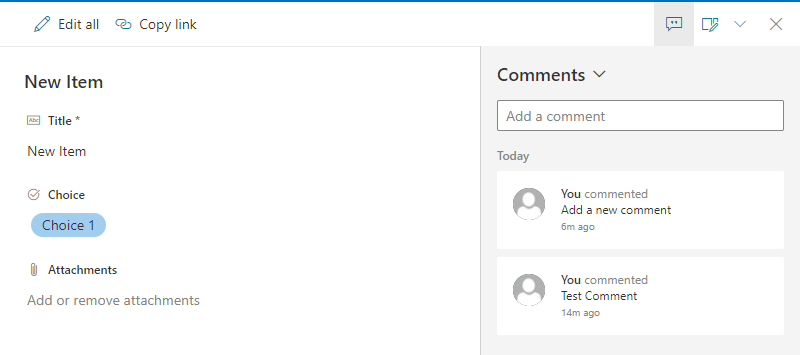
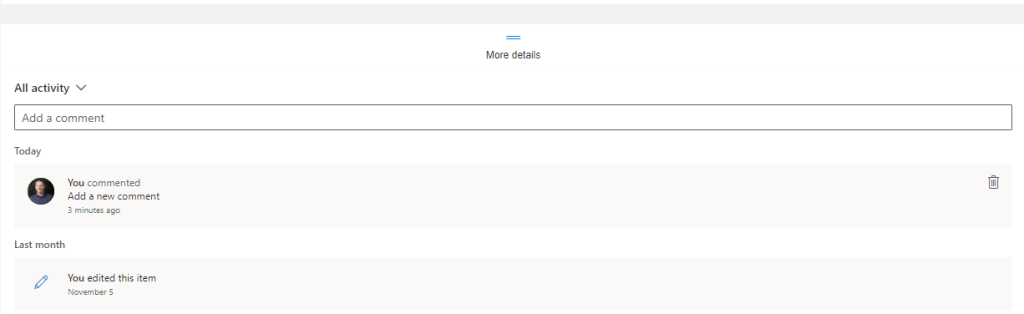
Recently someone had posted on a SharePoint support forum asking whether or not it was possible to retrieve the new modern list item comments programmatically. In case you haven’t seen this yet, Microsoft has introduced the ability for users to add comments to the activity feed on list items in SharePoint.
To add a comment, navigate to your list item, open up the information pane and scroll to bottom. You will see the activity feed where you can add, remove and view comments from yourself and others on a list item.
While the endpoint is not yet documented, it is indeed possible to interact with these comments. However, be aware, the comments are not apart of the list item object in REST, you must call a different endpoint to retrieve the values.
Get list item comments using REST
To retrieve all of the comments on a list item using REST, you can make a GET call the following API endpoint.
If you ever used the classic Wiki pages in SharePoint, there was a really cool feature that allowed users to link to pages that did not exist yet. In SharePoint Wikis, you could link to another page on your site using the double bracket syntax. Example:
Please go to the [[Announcements]] page.
SharePoint would handle this by connecting the the Announcements page to the text within the brackets. The really cool thing about this is if a user clicked on a link to a page that didn’t exist it yet, SharePoint would ask them to create a new page! This is similar to how Wikipedia creates empty hyperlinks to pages that still need to be created.
A question came up in a SharePoint sub-reddit asking whether this works in Modern SharePoint. The answer is YES!
Back to basics
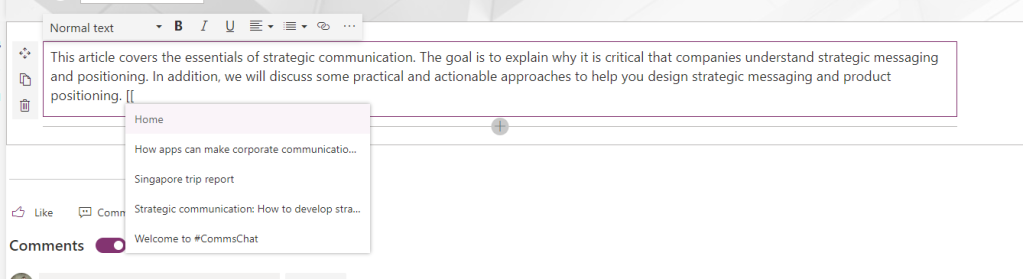
To see this feature in action, create a new page in your SharePoint site and add a text webpart to the page.
Let’s say at the end of this text, we would like to add a link to an existing page within this site. All we have to do is start typing “[[” and SharePoint will return all the pages we can link to.
If we wanted to link to the Singapore trip report page, we could then just click that page from the dropdown, and it will become a direct link to that page. Pretty cool right!?
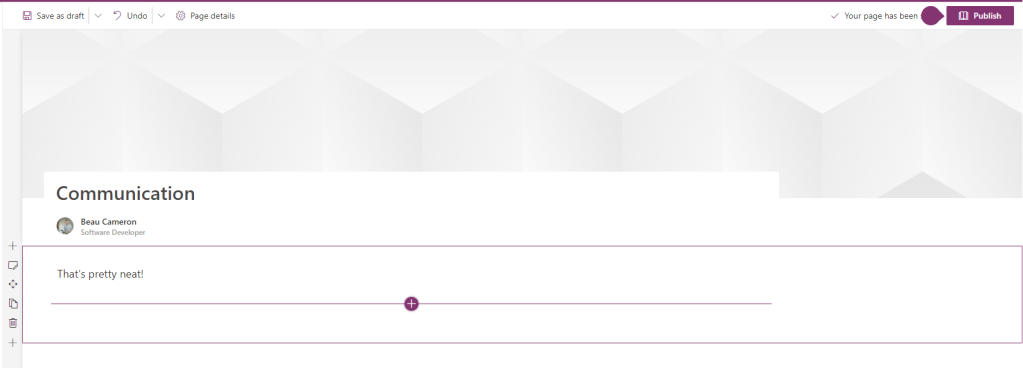
Creating a new page from a link
Now that we have seen how using the “[[” allows users to link to existing pages, lets see how Microsoft brought forward the classic Wiki linking functionality to allow users to create hyperlinks to pages that do not exist yet.
To do so, start by typing “[[“, but ignore the dropdown values for existing pages. Continue typing in the title for a new page and close it with two double brackets “]]”. Make sure you press space key or click away from the “]]” or else the resulting link will be a 404.
Once this happens, SharePoint will automatically create a hyperlink for us.
If you look closely at the link, you’ll notice that the URL points to a new page (doesn’t exist), and it passes along the ?wikiTitle=Communication query string.
The wikiTitle query string parameter notifies SharePoint to not throw a 404 error, but instead initiate the new modern page creation flow. When a user clicks on this link, SharePoint will popup the page template selection screen!
Once a user selects a template, they will be brought to the new Communication page to continue editing and finish creating the page.
This page has also now been linked correctly to our previous page!
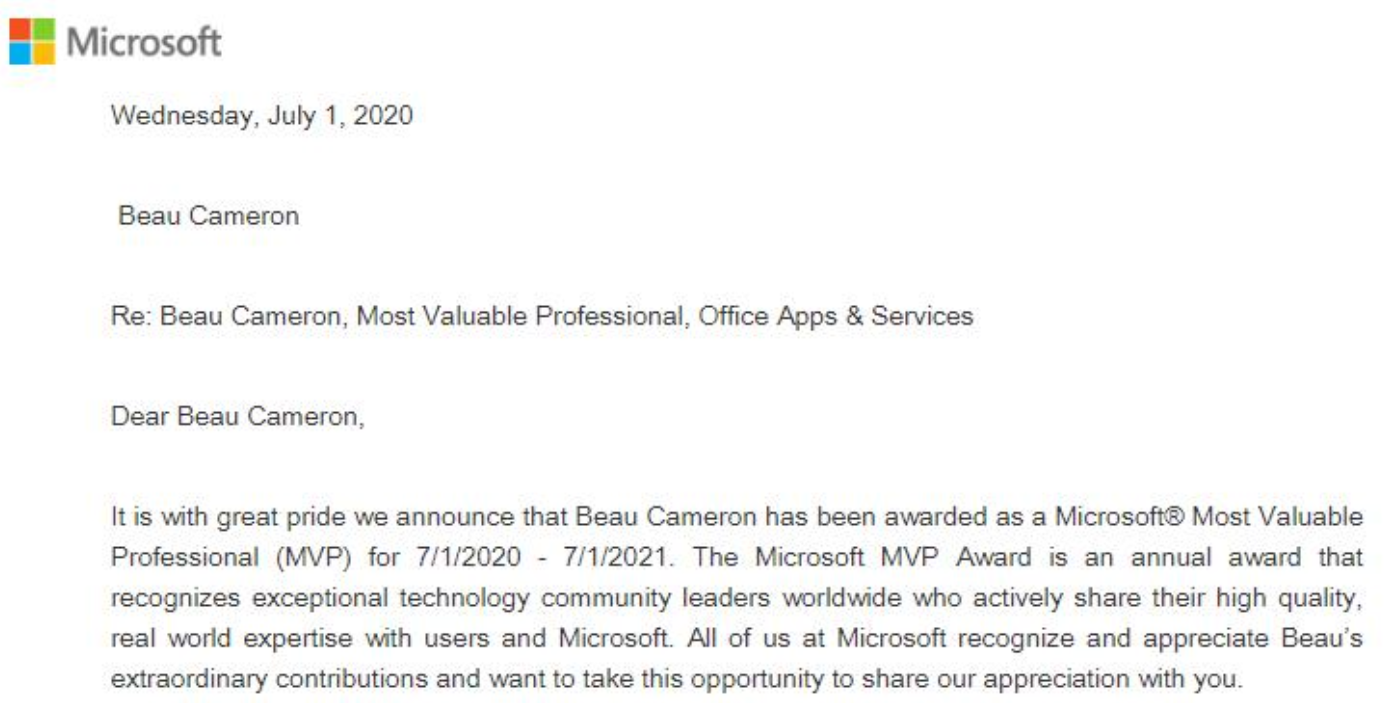
It’s that time of the year… July 1st has arrived and the Microsoft MVP renewals have been completed! I am excited and honored to announce that I have been re-awarded Microsoft MVP for Office Apps and Services for a third time.
Once again, I’d like to thank Microsoft for continuing my involvement with the MVP program, and embracing the relationship between the platforms we use and the community that is heavily involved with it.
Recap: The Past year
The past year has been an awesome year for me, both personally and professionally. Each year I like to focus on new methods and ways in which I can interact with community — this past year was no exception.
Community Closeups
My good friend David Warner and myself wanted to start a new Podcast/Vodcast called Community Closeups. Community Closeups is a video series that highlights the unique and talented individuals in our community. It’s a laid back interview where we get personal and talk about what makes us unique — and of course, lots of SharePoint!
I would like to personally thank everyone who has been a guest on our show and sharing a little part of themselves with the rest of the community. As David always mentions, we know each other online through our photos and our avatars, but rarely do we get to learn about the personal sides of the people we interact with daily. Thank you, from the bottom of our hearts for making this show a success!
Microsoft 365 PnP Team
This year I was/am honored to be invited as member of the Microsoft 365 PnP Team. The PnP Team is a collective of Microsoft Employees and community developers who work together to provide solutions, tools and guidance to the community through various open source initiatives. Over the last year I’ve had the pleasure of working on the PnP SharePoint Starter Kit and working in various GitHub Issues lists. It’s with great joy that I am able to help contribute to solutions and guidance that help developers adapt to the ever evolving landscape of Office 365.
Speaking Events
This past year was a really fun year for speaking. David Warner and myself teamed up and delivered a series of SPFx and PnP presentations across the US! We started in Salt Lake City, UT early in the spring and in fall we completed a “back-to-back-to-back” weekend SharePoint Saturday tour starting in Los Angeles, followed by Boston and Denver! It was a great experience to share some of the tips and tricks for SharePoint Framework Development and meet all the extraordinary people in our community!
One of the coolest opportunities was being chosen to be a part of the Podcast center at Microsoft Ignite, where David and I hosted a Community Closeups episode with the great Vesa Juvonen!
Forums
One of the highlights for me every year is being a part of the rich community forums that we have. Whether you are a part of TechCommunity, Reddit SharePoint, Facebook SharePoint Groups, or any other forums, there is a limitless amount of knowledge sharing. The forums exist not only for asking for help and seeking guidance, but they are filled with community members sharing what they’ve learned, through blogs and videos and tutorials.
Looking Forward
2020 has started out to be a very interesting year. COVID-19 has introduced some difficulties in hosting in-person events, and as such, I likely won’t be speaking at too many conferences this year (unless virtual), but we are looking to try and host a SharePoint Saturday Event online at some point later this year or early next year!
This year I would like to take the opportunities to keep expanding Community Closeups and interviewing all the amazing people in our community (hopefully more interviews than last year!). If you want to be on the show… reach out!!
Per usual, you’ll be able to find me in the forums. Whether it’s Reddit, SP-Dev-Docs or Facebook groups, if you need something, you know where to find me! 🙂
Have you ever tried to apply column formatting to your SharePoint list views using code? If so, it’s likely you have come across this error and unfortunately there isn’t much information in the documentation on how the JSON Formatter string should be formatted. Take for example this scenario:
Updating a view format using PnP PowerShell
PnP PowerShell has functionality for setting properties of a view using the command Set-PnPView
Updating the formatting on your list is done by passing in a JSON string to your Set-PnPView command using the CustomFormatter value property.
Running this command, you will likely receive the following error: Set-PnPView : Name cannot begin with the ‘=’ character, hexadecimal value 0x3D.
The Fix:
The reason you are seeing this error is because in the JSON itself you need to encode some of the values if you are using operators. What I mean by that is, if you are using &&, or operators in formulas such as “>=” or “<=“, you need to use their encoded values instead. In our example, we were using [$DueDate] <= @now. In order to apply this to our view, we need to encode “<=” into “<=” and the formula will work.
Below is the following command with a working JSON formatter value.
If you love SharePoint, then you already know about it’s rich document and information management capabilities. Version history is a feature of SharePoint that is extremely powerful if you need to look back in history at the changes of an item. This works great if you are working with list items only, as you can see how the fields have changed on a specific item overtime. For documents and pages, SharePoint version history is unable to show us exactly what has changed within those pages.
Turns out, in modern SharePoint we do have better version history which shows us what changes have been done to modern site pages! This is an extremely powerful tool to keep track of changes of your modern SharePoint site pages over time.
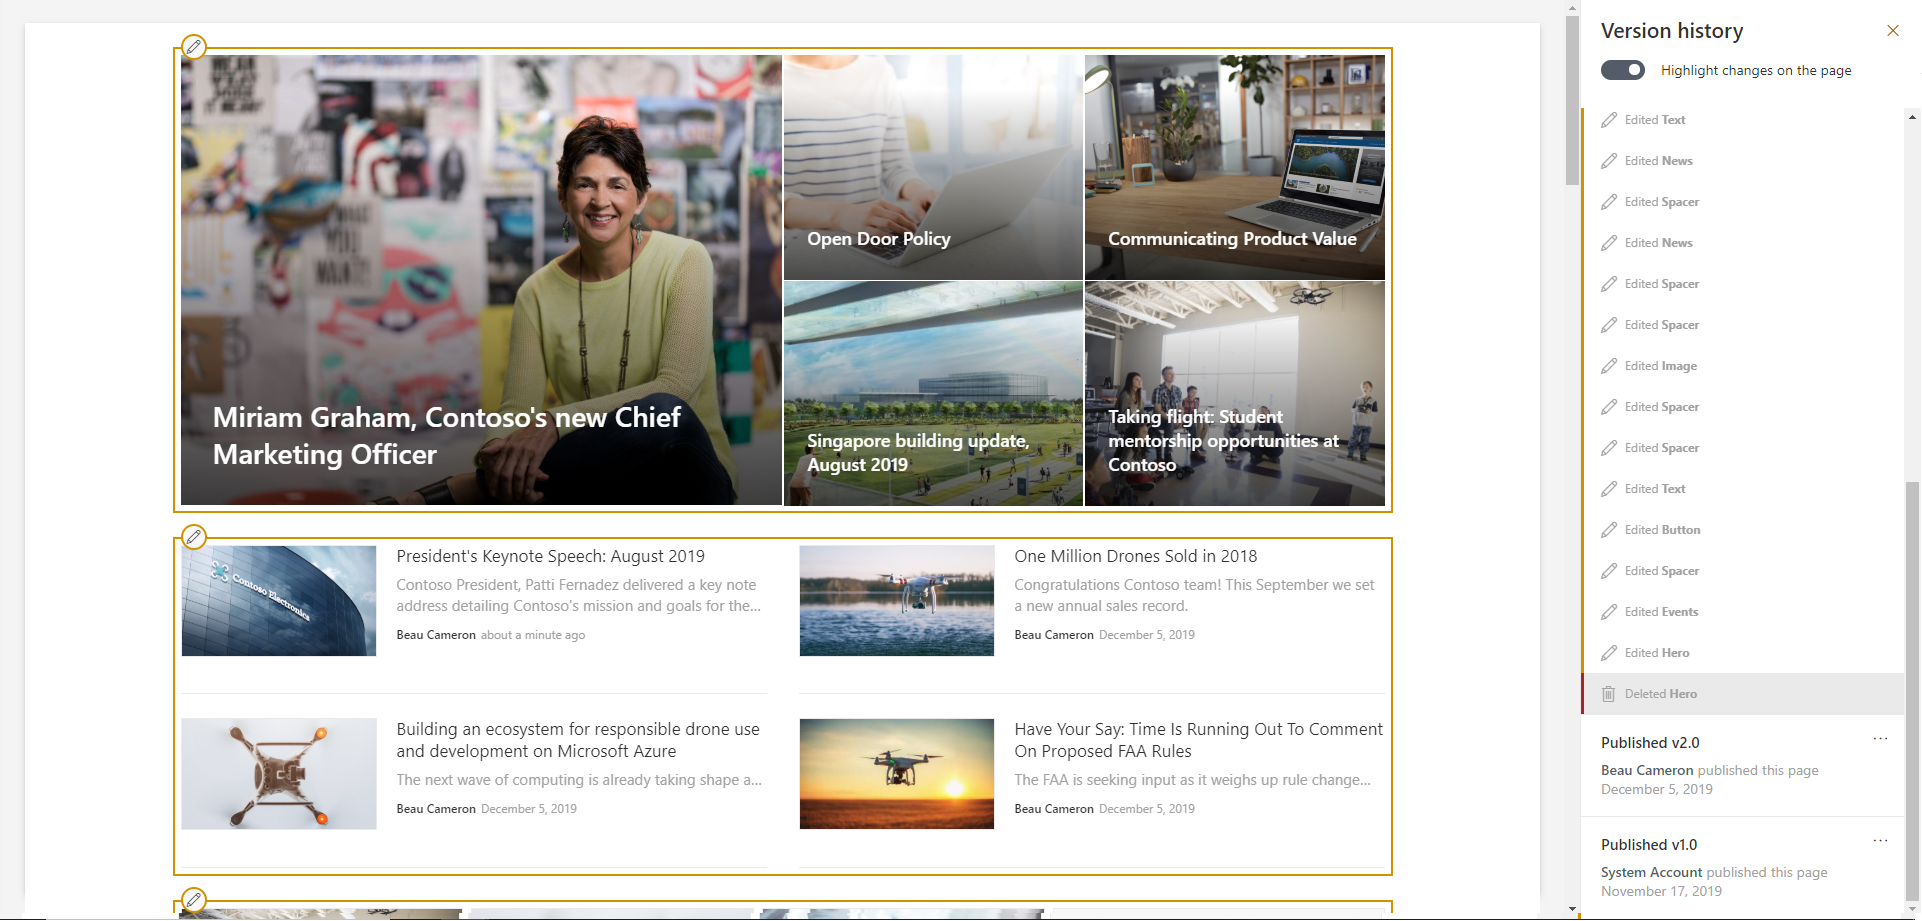
Viewing Version History
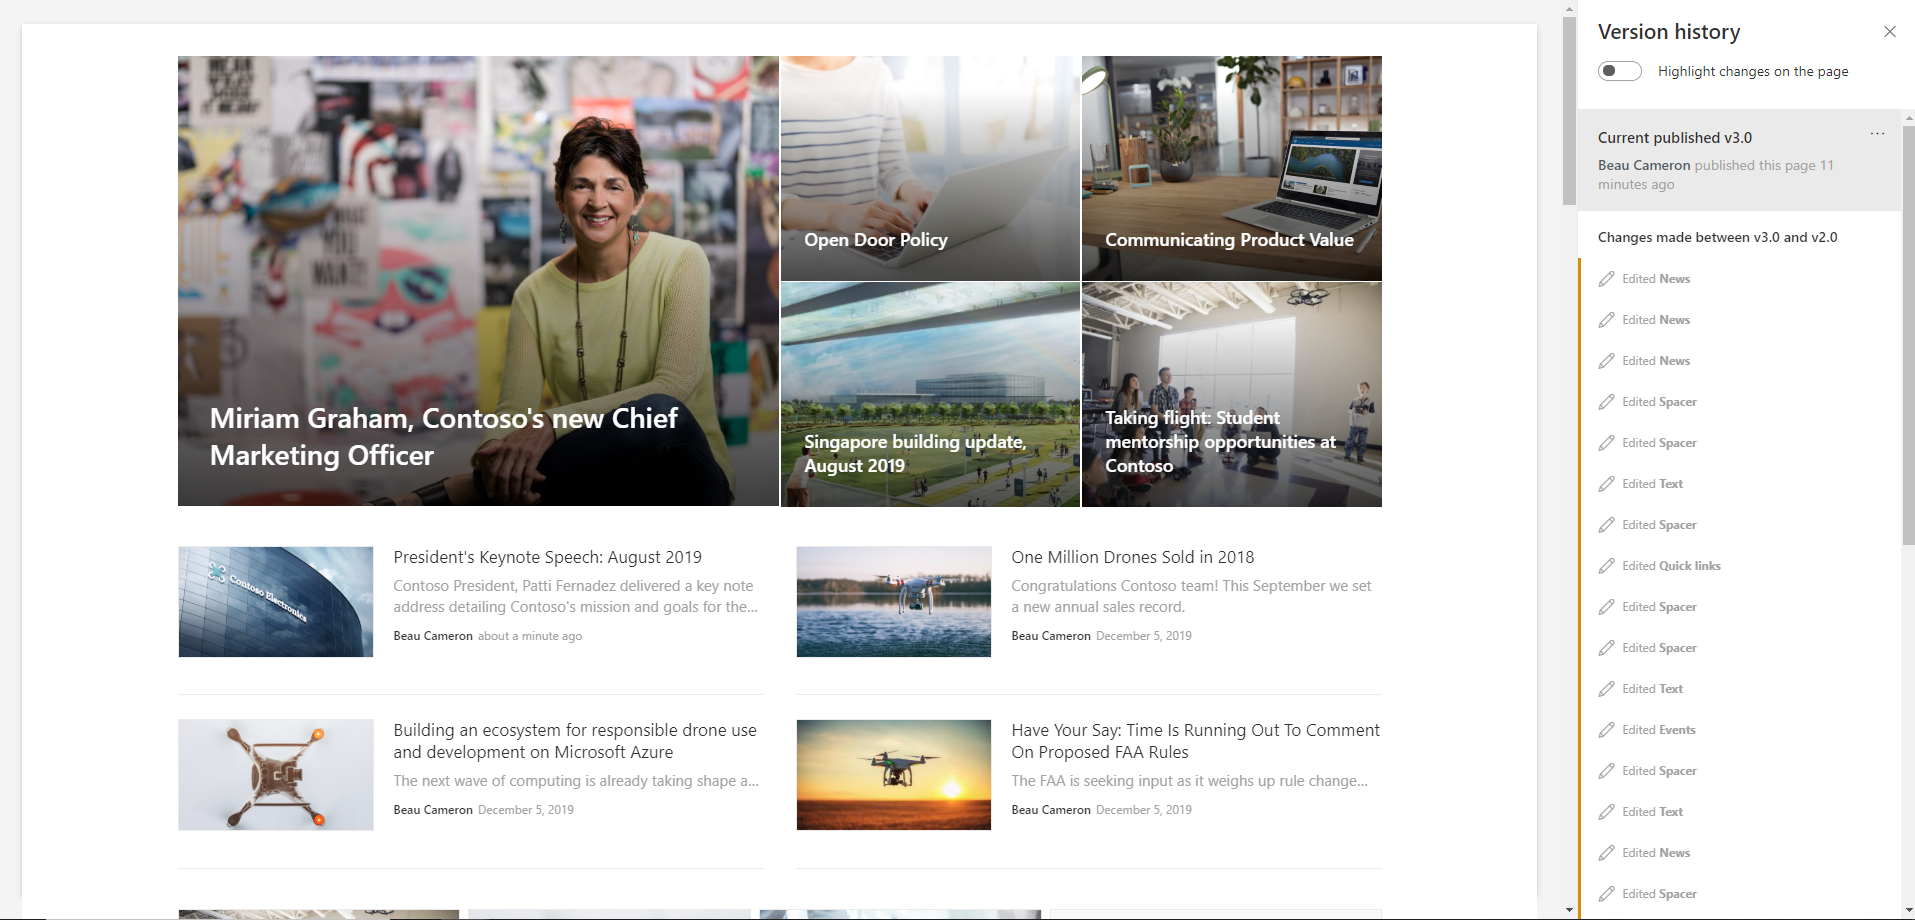
In order to view the version history of your modern SharePoint site pages, navigate to the page in question. In my scenario, we’ll be looking at a Communication site home page which has a series of hero, news and events web parts on it.
Accessing the version history is easy. On the page in question, select the “Published” button next to the “Edit” button in the top right of the page. The page will re-render and load a slide out panel from the right hand side, showing the version history of the page.
Notice how you can see a history of changes that were completed on the page. In my example, edits were made to News, Spacer, Text, Quicklinks, and Events between version v3.0 and v2.0. If I would like to dive into this a bit more, I can select “Highlight changes on the page” toggle from the top of the panel. When turning this one, new boxes will highlight around the web parts that were changed with a specific color.
Green means added, Yellow means edited and Red means deleted.
How awesome is that!? Do you think this is valuable? Any new features you’d love to see come to version history?
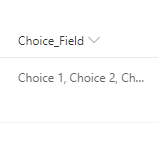
Recently I was perusing a SharePoint forum post and a member asked if there was a way to change the visual representation of a multiple value choice field in SharePoint. My first thought was to use JSON Column Formatting.
The problem
By default, SharePoint renders a multiple value choice field as a single string in a row, and renders the HTML as a single value in a div.
One question, if you aren’t familiar with JSON Column Formatting is how would we render these items as new lines if they represented as a single value in the HTML. You’d probably first go and see if you could split on the commas “,”… but unfortunately column formatting does not support a split function.
Introducing ‘forEach’
One feature that column formatting does have is the forEach function. This is an optional property that allows an element to duplicate itself for each member of a multi-valued field. To loop through multi-value fields we’d use the following format
"iteratorName in @currentField" or "iteratorName in [$FieldName]"
Once you’ve implemented the forEach, you have access to each member you are looping through by using the iterator name. For example, if we loop through @currentField using the following formula: "iteratorName in @currentField" we can gain access to each record using [$iteratorName].
Putting it into action
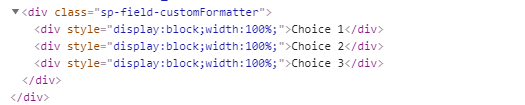
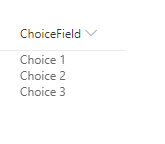
Now that we know we can loop through multi-choice fields, all we need to do is come up with a JSON column formatter which creates each record on it’s own row. See the below JSON object.
We are using the forEach property to loop through each choice value in the currentField. For each record, we set the textContext equal to the choice record, and then we just style the div to be displayed block and 100%
Recently, Microsoft has announced they are retiring Delve blogs. In doing so, Microsoft has also given us a schedule of important dates relating to the retirement.
Beginning December 18th, 2019, tenants will not have the ability to create new Delve Blogs
Beginning January 18th, 2020 the ability to create new posts in existing Delve blogs will be discontinued
Beginning April 17th, 2020, existing Delve blogs will be deleted and removed from Delve profiles
If your organization has been using Delve blogs, you are probably thinking “wow, I don’t have much time to migrate Delve blogs into communication sites“. That’s correct, it does feel pretty rushed. If you are looking into finding all of the blog sites in your tenant, here is a search query to help you out.
The above search query is fairly simple. It will search everything (*) where the path starts with the Delve Blog locations (path:yourtenant/portals/personal*) where the Content Type is the content type used for Delve Blogs (Story Page).
Another method for finding all blogs being used in your tenant is by using the Modernization Scanner. This is a tool that was designed to help companies modernize their classic sites by scanning tenants looking for things like InfoPath usage, Classic Workflows and more.
Well, starting in version 2.7, it will include the ability to scan your tenant for Delve blogs, using the same search methods above.
Thanks @Beau__Cameron , I've integrated the search based approach in the Modernization Scanner. Version 2.7 will list Delve blogs/pages. ETA for the release is end of this week latest